

Have you ever craved a snack that’s both sweet and salty, indulgent yet simple to make? Chocolate covered peanuts are the ultimate treat that checks all the boxes! Whether you’re looking for a quick dessert, a protein-packed energy boost, or a crowd-pleasing party snack, this recipe has you covered. With just a handful of pantry staples like roasted peanuts and high-quality chocolate, you can whip up a batch of these irresistible bites in no time. Plus, they’re endlessly customizable—add a sprinkle of sea salt, a drizzle of caramel, or even a dash of chili powder for a creative twist. Perfect for gifting, snacking, or topping your favorite desserts, chocolate covered peanuts are sure to become your new go-to treat. Ready to fall in love with this easy, versatile recipe? Let’s get started!
Table of Contents
Key Benefits
If you’re wondering why chocolate covered peanuts deserve a spot in your snack rotation, let me tell you—they’re a game-changer! This delightful combo of crunchy roasted peanuts and rich, velvety chocolate isn’t just delicious; it’s packed with benefits that make it a treat you can feel good about. Here’s why you’ll love them:
- Perfect Balance of Flavors: The sweet and salty pairing is a match made in snack heaven, satisfying all your cravings in one bite.
- Quick and Easy: With just a few simple ingredients and minimal prep time, this recipe is beginner-friendly and stress-free.
- Versatile Snacking: Whether you need a midday pick-me-up, a dessert topping, or a party snack, chocolate covered peanuts fit the bill.
- Nutritional Boost: Peanuts are a great source of protein and healthy fats, while dark chocolate adds antioxidants for a guilt-free indulgence.
- Customizable: From milk chocolate to dairy-free options, you can tailor this recipe to suit your taste or dietary needs.
Whether you’re a chocolate lover, a snack enthusiast, or just someone looking for a fun kitchen project, this recipe is sure to win you over. Ready to discover how easy it is to make your own batch? Let’s dive into the ingredients!
Ingredients
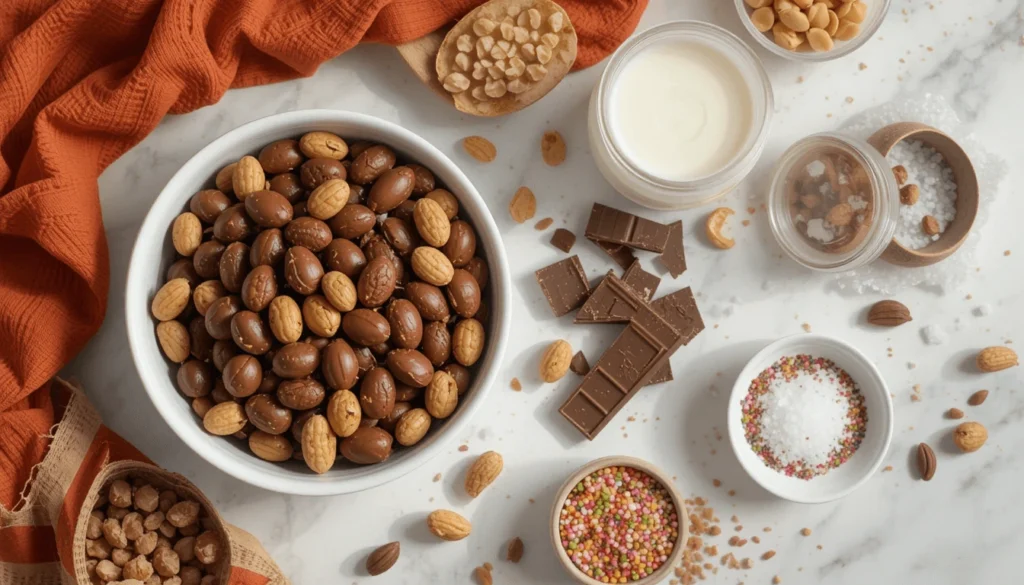
Gathering your ingredients is the first step to creating these irresistible chocolate covered peanuts. The best part? You likely already have most of these items in your pantry! Here’s what you’ll need:
- 2 cups roasted peanuts (unsalted or lightly salted, depending on your preference)
- 1 ½ cups high-quality chocolate (dark, milk, or white—choose your favorite!)
- 1 tablespoon coconut oil (optional, but it helps the chocolate melt smoothly)
- Toppings (optional): Sea salt, crushed nuts, sprinkles, or a drizzle of caramel for extra flair.
Tips for Ingredient Success
- Chocolate Matters: Use high-quality chocolate bars or chips for the best flavor and texture. Avoid candy melts if you want a richer taste.
- Peanut Perfection: Roasted peanuts add a deeper flavor, but raw peanuts work too—just toast them lightly for extra crunch.
- Customize It: Feel free to experiment with different chocolates or toppings to make this recipe your own.
With these simple ingredients, you’re just a few steps away from creating a snack that’s as fun to make as it is to eat. Ready to turn these pantry staples into something magical? Let’s move on to the step-by-step instructions!
How to Make Chocolate Covered Peanuts
Ready to transform simple ingredients into a snack that’s downright addictive? Let’s walk through the process step by step. Don’t worry—it’s easier than you think, and I’ll guide you through every detail to ensure success.
Step-by-Step Instructions
- Prepare Your Workspace:
- Line a baking sheet with parchment paper or a silicone mat. This will prevent the peanuts from sticking and make cleanup a breeze.
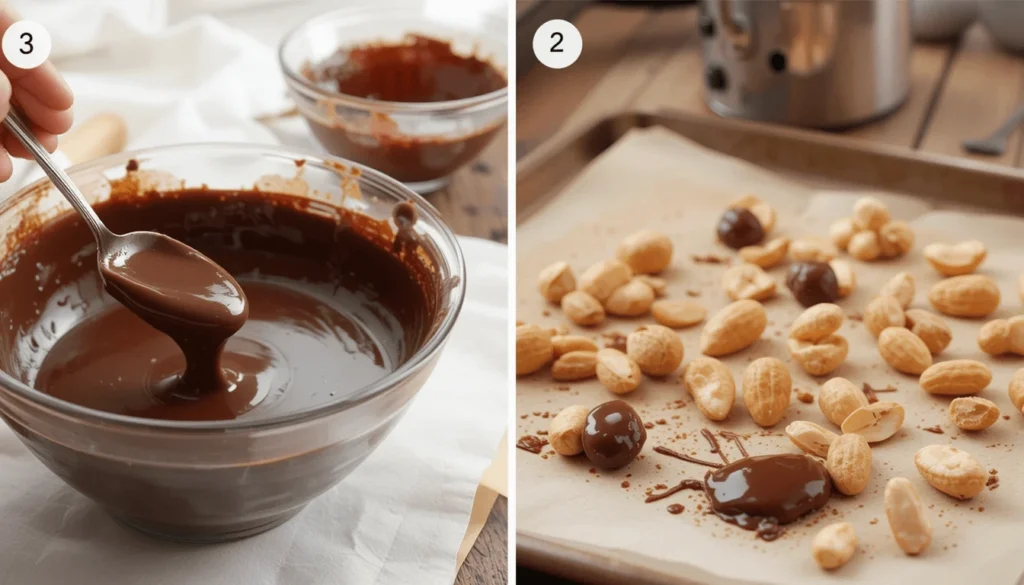
- Melt the Chocolate:
- In a microwave-safe bowl or using a double boiler, combine the chocolate and coconut oil (if using).
- Microwave Method: Heat in 30-second intervals, stirring between each, until smooth and fully melted.
- Double Boiler Method: Place the bowl over a pot of simmering water (make sure the bowl doesn’t touch the water) and stir until melted.
- Coat the Peanuts:
- Add the roasted peanuts to the melted chocolate. Use a spatula to gently fold them in until evenly coated.
- Scoop and Spread:
- Using a spoon or fork, scoop out small clusters of chocolate-covered peanuts and place them onto the prepared baking sheet.
- Leave a little space between each cluster to prevent them from sticking together.
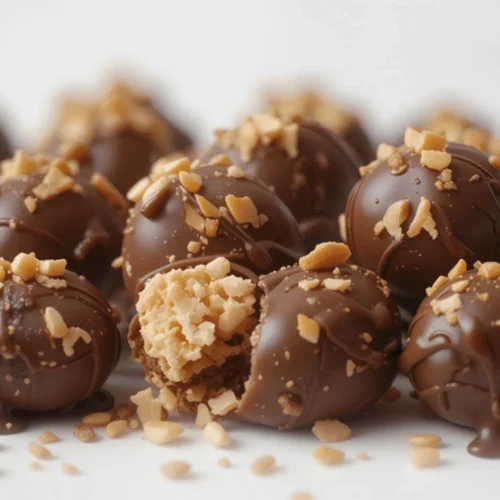
- Add Toppings (Optional):
- While the chocolate is still wet, sprinkle on your favorite toppings like sea salt, crushed nuts, or sprinkles for extra flavor and texture.
- Let Them Set:
- Allow the chocolate to harden at room temperature or speed up the process by placing the baking sheet in the refrigerator for 15–20 minutes.
Pro Tips for Perfect Results
- Work Quickly: Chocolate can start to set as it cools, so coat the peanuts and spread them out promptly.
- Even Coating: Stir gently to avoid breaking the peanuts, but make sure each one is fully covered for maximum deliciousness.
- Double-Dip for Extra Decadence: For a thicker chocolate layer, let the first coat set, then dip the clusters again in melted chocolate.
And there you have it—homemade chocolate covered peanuts that are crunchy, creamy, and utterly irresistible! Now that you’ve mastered the basics, let’s explore some fun variations and pro tips to take your snack game to the next level.
Pro Tips and Variations
Now that you’ve nailed the basics, let’s take your chocolate covered peanuts to the next level with some expert tips and creative twists. Whether you’re looking to experiment with flavors or troubleshoot common issues, I’ve got you covered.
Pro Tips for Success
- Temper Your Chocolate: For a glossy finish and a satisfying snap, temper your chocolate by melting 2/3 of it, then stirring in the remaining 1/3 until smooth.
- Use Room Temperature Peanuts: Cold peanuts can cause the chocolate to seize, so let them sit out for a bit before coating.
- Avoid Humidity: Chocolate and moisture don’t mix! Work in a cool, dry space to prevent the chocolate from becoming grainy.
- Storage Tips: Store your chocolate covered peanuts in an airtight container at room temperature for up to 2 weeks, or in the fridge for a firmer texture.
Fun Variations to Try
- Spicy Kick: Add a pinch of cayenne pepper or chili powder to the melted chocolate for a sweet-and-spicy combo.
- Nutty Bliss: Mix in other nuts like almonds or cashews for a mixed-nut medley.
- Caramel Drizzle: Drizzle melted caramel over the chocolate for a decadent touch.
- Vegan-Friendly: Use dairy-free chocolate and skip the coconut oil for a plant-based treat.
- Holiday Twist: Add festive sprinkles or crushed candy canes for a seasonal spin.
- Double-Dipped: After the first layer sets, dip the peanuts again for an extra-thick chocolate coating.
Troubleshooting Common Issues
- Grainy Chocolate: If your chocolate seizes or becomes grainy, add a teaspoon of coconut oil and stir gently to smooth it out.
- Too Thick or Thin: Adjust the consistency by adding more chocolate for thickness or a bit of oil for a smoother flow.
- Peanuts Falling Off: If the peanuts aren’t sticking, make sure they’re fully dry and free of excess oil before coating.
With these tips and variations, you can customize your chocolate covered peanuts to suit any occasion or craving. Ready to serve them up in style? Let’s move on to some creative serving suggestions!
Conclusion
There you have it—your ultimate guide to making chocolate covered peanuts that are as fun to create as they are to eat! This recipe is proof that sometimes the simplest treats can bring the most joy. With just a few ingredients and a little creativity, you’ve crafted a snack that’s crunchy, creamy, and utterly irresistible.
Whether you’re enjoying them as a quick energy boost, sharing them at a party, or gifting them to someone special, these chocolate covered peanuts are sure to impress. Plus, with all the tips, variations, and serving ideas we’ve covered, you can make this recipe your own and adapt it to any occasion.
So, what are you waiting for? Grab your ingredients, melt that chocolate, and start coating those peanuts. Trust me, once you taste that perfect balance of sweet and salty, you’ll understand why this treat is a timeless favorite.
Don’t forget to share your creations with friends and family—or keep them all to yourself (no judgment here!). And if you’ve got questions or want to explore more delicious recipes, check out the FAQs below. Happy snacking! 🥜🍫
______________________________________________________
chocolate covered peanuts
Ingredients
- 2 cups roasted peanuts unsalted or lightly salted, depending on your preference
- 1 ½ cups high-quality chocolate dark, milk, or white—choose your favorite!
- 1 tablespoon coconut oil optional, but it helps the chocolate melt smoothly
- Toppings optional: Sea salt, crushed nuts, sprinkles, or a drizzle of caramel for extra flair.
Tips for Ingredient Success
- Chocolate Matters: Use high-quality chocolate bars or chips for the best flavor and texture. Avoid candy melts if you want a richer taste.
- Peanut Perfection: Roasted peanuts add a deeper flavor but raw peanuts work too—just toast them lightly for extra crunch.
- Customize It: Feel free to experiment with different chocolates or toppings to make this recipe your own.
Instructions
Prepare Your Workspace:
- Line a baking sheet with parchment paper or a silicone mat. This will prevent the peanuts from sticking and make cleanup a breeze.
Melt the Chocolate:
- In a microwave-safe bowl or using a double boiler, combine the chocolate and coconut oil (if using).
- Microwave Method: Heat in 30-second intervals, stirring between each, until smooth and fully melted.
- Double Boiler Method: Place the bowl over a pot of simmering water (make sure the bowl doesn’t touch the water) and stir until melted.
Coat the Peanuts:
- Add the roasted peanuts to the melted chocolate. Use a spatula to gently fold them in until evenly coated.
Scoop and Spread:
- Using a spoon or fork, scoop out small clusters of chocolate-covered peanuts and place them onto the prepared baking sheet.
- Leave a little space between each cluster to prevent them from sticking together.
Add Toppings (Optional):
- While the chocolate is still wet, sprinkle on your favorite toppings like sea salt, crushed nuts, or sprinkles for extra flavor and texture.
Let Them Set:
- Allow the chocolate to harden at room temperature or speed up the process by placing the baking sheet in the refrigerator for 15–20 minutes.
Pro Tips for Perfect Results
- Work Quickly: Chocolate can start to set as it cools, so coat the peanuts and spread them out promptly.
- Even Coating: Stir gently to avoid breaking the peanuts, but make sure each one is fully covered for maximum deliciousness.
- Double-Dip for Extra Decadence: For a thicker chocolate layer, let the first coat set, then dip the clusters again in melted chocolate.
Notes
- Calories: 200 kcal
- Fat: 14g
- Saturated Fat: 6g
- Protein: 5g
- Carbohydrates: 15g
- Fiber: 2g
- Sugar: 10g
- Sodium: 50mg
FAQs
Got questions about making chocolate covered peanuts? Don’t worry—I’ve got answers! Here are some common queries and practical tips to help you master this recipe like a pro.
1. How long do chocolate covered peanuts last?
When stored in an airtight container at room temperature, they’ll stay fresh for up to 2 weeks. For a firmer texture, you can refrigerate them for up to 3 weeks. Just be sure to let them come to room temperature before serving for the best flavor.
2. Can I use raw peanuts instead of roasted?
Absolutely! If you prefer raw peanuts, simply spread them on a baking sheet and roast them in the oven at 350°F (175°C) for 10–15 minutes, stirring occasionally, until golden and fragrant. Let them cool completely before coating with chocolate
3. What’s the best chocolate to use?
High-quality chocolate bars or chips work best for a rich, smooth finish. You can use dark, milk, or white chocolate depending on your preference. Avoid candy melts if you want a more authentic chocolate flavor.
4. How do I prevent the chocolate from seizing?
Chocolate can seize if it comes into contact with even a drop of water. Make sure all your tools and bowls are completely dry. If your chocolate does seize, add a teaspoon of coconut oil or vegetable oil and stir gently to smooth it out.
5. Can I make this recipe vegan?
Yes! Use dairy-free chocolate and skip the coconut oil if needed. Check that your peanuts are processed in a nut-free facility if you’re catering to allergies.
6. How can I make the chocolate coating thicker?
For a thicker layer, let the first coat of chocolate set completely, then dip the peanuts again in melted chocolate. This double-dipping method adds extra decadence!
7. What are some creative topping ideas?
The possibilities are endless! Try:
– Sea salt for a sweet-and-salty combo.
– Crushed nuts for added crunch.
– Sprinkles for a festive touch.
– Cocoa powder for a rich, bittersweet finish.
8. Can I use this recipe for other nuts?
Definitely! This method works beautifully with almonds, cashews, pecans, or even mixed nuts. Just adjust the quantities as needed.
9. How do I fix grainy chocolate?
Grainy chocolate usually means it’s overheated or has come into contact with moisture. To fix it, add a small amount of coconut oil or vegetable oil and stir gently until smooth.
10. Can I freeze chocolate covered peanuts?
Yes! Place them in a single layer on a baking sheet to freeze, then transfer to an airtight container or freezer bag. They’ll keep for up to 2 months. Thaw at room temperature before serving.
With these FAQs, you’re all set to tackle any challenge that comes your way while making chocolate covered peanuts. If you have more questions or want to share your creations, drop a comment below—I’d love to hear from you! Happy snacking! 🥜🍫