

There’s something truly magical about biting into a brownie that’s rich, fudgy, and loaded with delightful surprises. Enter Heavenly Hash Brownies—a dessert that takes the classic brownie to a whole new level of indulgence. Imagine a rich chocolatey base, studded with crunchy pecans, and topped with a layer of gooey marshmallows that melt into perfection as they bake. Every bite is a symphony of textures and flavors, making these brownies the ultimate treat for anyone with a sweet tooth.
What sets Heavenly Hash Brownies apart is their unique combination of ingredients. The marshmallows add a soft, chewy contrast to the dense, fudgy brownie base, while the nuts provide a satisfying crunch. Whether you’re baking for a special occasion, a family gathering, or simply to satisfy a craving, these brownies are guaranteed to impress. Plus, they’re surprisingly easy to make, even if you’re not an experienced baker.
In this recipe, we’ll walk you through every step to create these irresistible brownies. From gathering the ingredients to mastering the perfect bake, you’ll learn how to make a dessert that’s as fun to prepare as it is to eat. So, preheat your oven and get ready to embark on a sweet escape with Heavenly Hash Brownies—a treat you’ll love from the very first bite.
Table of Contents
Key Benefits
Heavenly Hash Brownies aren’t just a dessert—they’re an experience. Here’s why this recipe stands out and why you’ll want to make it again and again:
- Irresistible Texture Combination:
These brownies are a masterclass in texture. The fudgy, chocolatey base pairs perfectly with the gooey marshmallows and crunchy pecans, creating a delightful contrast in every bite. It’s a treat that keeps your taste buds excited from start to finish. - Perfect for Any Occasion:
Whether you’re hosting a party, celebrating a special event, or simply treating yourself after a long day, Heavenly Hash Brownies fit the bill. They’re versatile, crowd-pleasing, and always a hit with dessert lovers of all ages. - Easy to Make:
Don’t let the decadent results fool you—this recipe is beginner-friendly. With simple ingredients and straightforward steps, even first-time bakers can achieve bakery-quality brownies at home. - Customizable to Your Preferences:
Love nuts? Add extra pecans or swap them for walnuts or almonds. Not a fan of marshmallows? Skip them or try a fun twist with caramel swirls. This recipe is adaptable to suit your tastes and dietary needs, including gluten-free or nut-free options. - Comfort in Every Bite:
There’s something deeply comforting about the rich chocolate flavor and gooey marshmallow topping. These brownies are the ultimate indulgence, offering a sweet escape that feels like a warm hug in dessert form. - Great for Sharing (or Not!):
Heavenly Hash Brownies are perfect for sharing with friends and family—or keeping all to yourself. They store well, so you can enjoy them fresh out of the oven or savor them over a few days (if they last that long!). - A Crowd-Pleasing Dessert:
If you’re looking for a dessert that will earn you rave reviews, this is it. The combination of flavors and textures is sure to impress, making these brownies a standout at any gathering.
In short, Heavenly Hash Brownies are more than just a dessert—they’re a celebration of flavor, texture, and pure indulgence. Whether you’re a seasoned baker or a novice in the kitchen, this recipe promises a delicious outcome that’s worth every minute of effort.
Ingredients

Creating Heavenly Hash Brownies requires a handful of simple, high-quality ingredients that come together to create a dessert that’s rich, gooey, and utterly irresistible. Here’s everything you’ll need:
For the Brownie Base:
- 1 cup (2 sticks) unsalted butter: Melted for a rich, fudgy texture.
- 2 cups granulated sugar: Adds sweetness and helps create that classic brownie crust.
- 4 large eggs: Room temperature for even mixing.
- 2 teaspoons vanilla extract: Enhances the chocolate flavor.
- 1 cup unsweetened cocoa powder: Use high-quality cocoa for a deep, chocolatey taste.
- 1 cup all-purpose flour: Provides structure to the brownies.
- ½ teaspoon baking powder: Helps the brownies rise slightly.
- ¼ teaspoon salt: Balances the sweetness and enhances the flavors.
For the Heavenly Hash Topping:
- 2 cups mini marshmallows: These melt into a gooey, irresistible layer.
- 1 cup chopped pecans: Adds a satisfying crunch and nutty flavor. You can substitute with walnuts or almonds if preferred.
Optional Add-Ins:
- ½ cup chocolate chips: For extra chocolatey goodness.
- ½ cup caramel bits: Swirl into the batter for a fun twist.
Substitutions and Dietary Adjustments:
- Gluten-Free: Replace all-purpose flour with a 1:1 gluten-free flour blend.
- Nut-Free: Omit the pecans or replace them with seeds like sunflower or pumpkin seeds.
- Dairy-Free: Use plant-based butter and ensure your marshmallows are vegan-friendly.
Equipment Needed:
- 9×13-inch baking pan: For even baking.
- Parchment paper or non-stick spray: To prevent sticking.
- Mixing bowls: One for wet ingredients, one for dry.
- Whisk and spatula: For mixing and spreading the batter.
- Toothpick: To test for doneness.
Why These Ingredients Work:
- The unsweetened cocoa powder and butter create a rich, chocolatey base that’s deeply flavorful.
- Mini marshmallows melt into a gooey layer that contrasts beautifully with the fudgy brownie.
- Chopped pecans add a satisfying crunch and nutty depth, balancing the sweetness.
With these ingredients on hand, you’re ready to create a dessert that’s as delightful to make as it is to eat. Let’s move on to the instructions!
Instructions
Follow these step-by-step instructions to create your Heavenly Hash Brownies. The process is simple, but attention to detail will ensure perfect results every time.
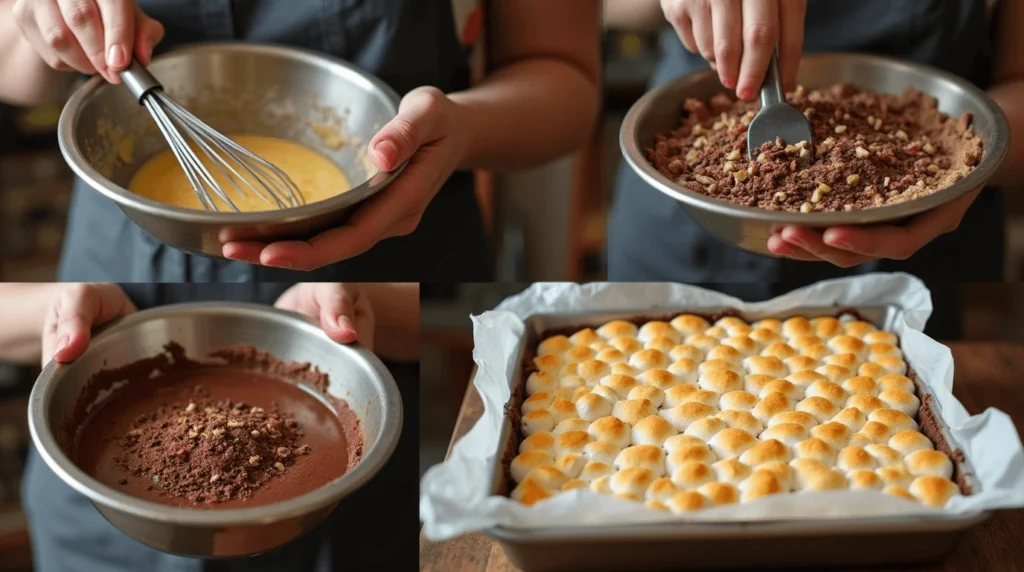
Step 1: Preheat and Prepare
- Preheat your oven to 350°F (175°C). This ensures the oven is at the right temperature for even baking.
- Prepare your baking pan: Line a 9×13-inch baking pan with parchment paper or lightly grease it with non-stick spray. This prevents the brownies from sticking and makes cleanup easier.
Step 2: Mix the Wet Ingredients
- Melt the butter: In a microwave-safe bowl or saucepan, melt 1 cup (2 sticks) of unsalted butter. Let it cool slightly.
- Combine sugar and butter: In a large mixing bowl, whisk together the melted butter and 2 cups of granulated sugar until well combined.
- Add eggs and vanilla: Beat in 4 large eggs, one at a time, followed by 2 teaspoons of vanilla extract. Mix until the batter is smooth and slightly glossy.
Step 3: Add the Dry Ingredients
- Sift dry ingredients: In a separate bowl, sift together 1 cup of unsweetened cocoa powder, 1 cup of all-purpose flour, ½ teaspoon of baking powder, and ¼ teaspoon of salt. Sifting prevents lumps and ensures even distribution.
- Combine wet and dry ingredients: Gradually add the dry ingredients to the wet mixture, stirring gently with a spatula or whisk. Mix until just combined—avoid overmixing to keep the brownies tender.
Step 4: Fold in Add-Ins
- Add nuts and chocolate chips: Gently fold in 1 cup of chopped pecans and ½ cup of chocolate chips (if using). This adds texture and extra flavor to the brownies.
Step 5: Bake the Brownies
- Spread the batter: Pour the batter into the prepared baking pan, spreading it evenly with a spatula.
- Bake: Place the pan in the preheated oven and bake for 25-30 minutes. The edges should be set, but the center should still be slightly soft.
Step 6: Add the Marshmallow Topping
- Sprinkle marshmallows: Once the brownies are almost done baking (around the 25-minute mark), remove them from the oven and quickly sprinkle 2 cups of mini marshmallows evenly over the top.
- Return to oven: Place the pan back in the oven for 2-3 minutes, or just until the marshmallows are puffed and golden. Watch closely to prevent burning.
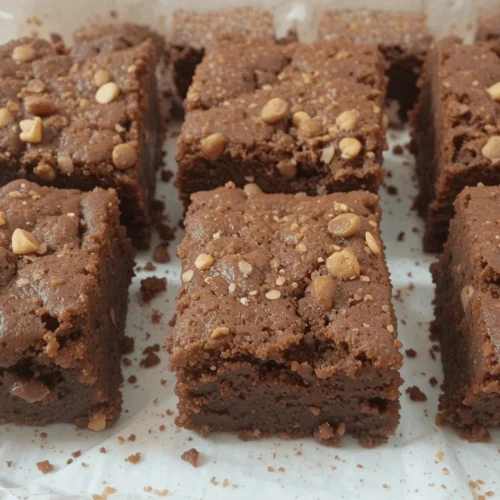
Step 7: Cool and Slice
- Cool completely: Let the brownies cool in the pan for at least 30 minutes. This allows the marshmallow layer to set slightly.
- Slice and serve: Use a sharp knife to cut the brownies into squares. For clean slices, wipe the knife with a warm, damp cloth between cuts.
Pro Tip:
- Toothpick test: To check for doneness, insert a toothpick into the center of the brownies. It should come out with a few moist crumbs but not wet batter.
With these instructions, you’ll have a batch of Heavenly Hash Brownies that are fudgy, gooey, and utterly irresistible. Now, let’s move on to some expert tips and variations to make this recipe your own!
Pro Tips and Variations
Making Heavenly Hash Brownies is already a rewarding experience, but with these pro tips and creative variations, you can take your brownies to the next level. Whether you’re a beginner or a seasoned baker, these suggestions will help you perfect the recipe and make it uniquely yours.
Pro Tips for Perfect Brownies:
- Use Room-Temperature Ingredients:
Ensure your eggs and butter are at room temperature before mixing. This helps create a smoother batter and even baking. - Don’t Overmix the Batter:
Mix the ingredients until just combined. Overmixing can lead to dense, tough brownies instead of the desired fudgy texture. - Toast the Nuts:
For an extra layer of flavor, toast the chopped pecans (or your preferred nuts) in a dry skillet over medium heat for 3-5 minutes before adding them to the batter. This enhances their natural nuttiness. - Watch the Marshmallows Closely:
When adding the marshmallows, keep a close eye on them in the oven. They can go from golden to burnt in seconds. - Line Your Pan with Parchment Paper:
This not only prevents sticking but also makes it easier to lift the brownies out of the pan for slicing. - Let the Brownies Cool Completely:
While it’s tempting to dig in right away, allowing the brownies to cool ensures the marshmallow layer sets and makes slicing cleaner. - Use a Warm Knife for Slicing:
Dip your knife in warm water and wipe it dry before slicing. This helps cut through the gooey marshmallow layer without making a mess.
Creative Variations:
- Caramel Swirl Brownies:
Drizzle ½ cup of caramel sauce over the brownie batter before baking. Use a toothpick to swirl it into the batter for a marbled effect. - Peanut Butter Lovers:
Add ½ cup of peanut butter chips to the batter or swirl ¼ cup of melted peanut butter on top before adding the marshmallows. - Mint Chocolate Twist:
Replace the vanilla extract with 1 teaspoon of peppermint extract for a refreshing mint-chocolate flavor. - Gluten-Free Option:
Substitute the all-purpose flour with a 1:1 gluten-free flour blend. Ensure all other ingredients, like marshmallows, are gluten-free. - Nut-Free Version:
Skip the pecans or replace them with seeds like sunflower or pumpkin seeds for a crunchy texture without nuts. - Double Chocolate:
Add ½ cup of dark or semi-sweet chocolate chunks to the batter for an extra chocolatey experience. - S’mores-Inspired Brownies:
Crush graham crackers and sprinkle them over the marshmallow layer before the final bake. This adds a fun s’mores twist. - Spiced Brownies:
Add 1 teaspoon of cinnamon or a pinch of cayenne pepper to the dry ingredients for a warm, spiced flavor.
Storage Tips:
- Room Temperature: Store the brownies in an airtight container at room temperature for up to 3 days.
- Refrigerator: For longer storage, keep them in the fridge for up to a week. Let them come to room temperature before serving.
- Freezer: Wrap individual brownies tightly in plastic wrap and freeze for up to 3 months. Thaw at room temperature before enjoying.
With these tips and variations, you can customize Heavenly Hash Brownies to suit your taste or experiment with new flavors. Next, let’s explore some delicious serving suggestions to make your brownies even more special!
Serving Suggestions
Heavenly Hash Brownies are a show-stopping dessert on their own, but pairing them with complementary flavors and creative presentations can elevate them to a whole new level. Here are some delightful serving ideas to make your brownies even more memorable:
1. Classic Pairings:
- Vanilla Ice Cream:
Serve a warm brownie square with a scoop of vanilla ice cream. The contrast between the warm, gooey brownie and the cold, creamy ice cream is irresistible. - Whipped Cream:
Top your brownies with a dollop of freshly whipped cream for a light and airy contrast to the rich chocolate. - Chocolate Sauce:
Drizzle warm chocolate sauce over the brownies for an extra dose of decadence.
2. Fun Toppings:
- Toasted Pecans or Almonds:
Sprinkle extra toasted nuts on top for added crunch and flavor. - Fresh Berries:
Add a handful of fresh raspberries or strawberries for a pop of color and a tart contrast to the sweetness. - Caramel Drizzle:
Drizzle caramel sauce over the brownies for a sweet, buttery finish.
3. Creative Presentations:
- Brownie Sundae:
Crumble a brownie into a bowl, layer it with ice cream, whipped cream, and your favorite toppings like sprinkles, nuts, or chocolate chips. - Brownie Skewers:
Cut the brownies into bite-sized pieces and thread them onto skewers with marshmallows and fruit for a fun, shareable dessert. - Mini Dessert Cups:
Layer small pieces of brownie with pudding, mousse, or yogurt in individual cups for a stylish dessert.
4. Beverage Pairings:
- Coffee:
A cup of freshly brewed coffee complements the rich chocolate flavor of the brownies. - Milk:
A classic pairing—cold milk balances the sweetness and richness of the brownies. - Hot Chocolate:
Double down on chocolate with a mug of hot chocolate for the ultimate indulgence.
5. Seasonal Twists:
- Holiday Style:
During the holidays, add a sprinkle of crushed candy canes or a dusting of powdered sugar for a festive touch. - Summer Vibes:
Serve the brownies with a side of grilled pineapple or mango slices for a tropical twist.
6. For Special Diets:
- Gluten-Free Option:
Pair gluten-free brownies with gluten-free ice cream or toppings. - Vegan Style:
Serve vegan brownies with dairy-free ice cream or coconut whipped cream.
With these serving suggestions, you can turn Heavenly Hash Brownies into a versatile dessert that suits any occasion, from casual family dinners to elegant gatherings. Next, let’s wrap up with a conclusion that ties everything together!
Conclusion
Heavenly Hash Brownies are more than just a dessert—they’re a celebration of flavor, texture, and pure indulgence. From the rich, fudgy chocolate base to the gooey marshmallow topping and satisfying crunch of pecans, every bite is a delightful experience that’s sure to leave you craving more. Whether you’re baking for a special occasion, treating yourself after a long day, or sharing with loved ones, these brownies are guaranteed to impress.
What makes this recipe truly special is its versatility. With simple ingredients and easy-to-follow instructions, even beginner bakers can achieve bakery-quality results. And with the endless variations and serving suggestions, you can customize these brownies to suit your taste or experiment with new flavors. They’re perfect for any occasion, from casual family gatherings to festive celebrations.
So, preheat your oven, gather your ingredients, and get ready to create a dessert that’s as fun to make as it is to eat. Heavenly Hash Brownies are more than just a treat—they’re a sweet escape that brings joy with every bite. Don’t forget to share your creations with friends and family, or keep them all to yourself (we won’t judge!). Either way, these brownies are sure to become a favorite in your recipe collection.
Now that you’ve mastered the art of Heavenly Hash Brownies, it’s time to enjoy the fruits of your labor. Slice, serve, and savor every moment of this delicious dessert adventure. Happy baking!
_________________________________________________
Heavenly Hash Brownies
Ingredients
For the Brownie Base:
- 1 cup 2 sticks unsalted butter: Melted for a rich, fudgy texture.
- 2 cups granulated sugar: Adds sweetness and helps create that classic brownie crust.
- 4 large eggs: Room temperature for even mixing.
- 2 teaspoons vanilla extract: Enhances the chocolate flavor.
- 1 cup unsweetened cocoa powder: Use high-quality cocoa for a deep chocolatey taste.
- 1 cup all-purpose flour: Provides structure to the brownies.
- ½ teaspoon baking powder: Helps the brownies rise slightly.
- ¼ teaspoon salt: Balances the sweetness and enhances the flavors.
For the Heavenly Hash Topping:
- 2 cups mini marshmallows: These melt into a gooey irresistible layer.
- 1 cup chopped pecans: Adds a satisfying crunch and nutty flavor. You can substitute with walnuts or almonds if preferred.
Optional Add-Ins:
- ½ cup chocolate chips: For extra chocolatey goodness.
- ½ cup caramel bits: Swirl into the batter for a fun twist.
- Substitutions and Dietary Adjustments:
- Gluten-Free: Replace all-purpose flour with a 1:1 gluten-free flour blend.
- Nut-Free: Omit the pecans or replace them with seeds like sunflower or pumpkin seeds.
- Dairy-Free: Use plant-based butter and ensure your marshmallows are vegan-friendly.
Instructions
Step 1: Preheat and Prepare
- Preheat your oven to 350°F (175°C). This ensures the oven is at the right temperature for even baking.
- Prepare your baking pan: Line a 9×13-inch baking pan with parchment paper or lightly grease it with non-stick spray. This prevents the brownies from sticking and makes cleanup easier.
Step 2: Mix the Wet Ingredients
- Melt the butter: In a microwave-safe bowl or saucepan, melt 1 cup (2 sticks) of unsalted butter. Let it cool slightly.
- Combine sugar and butter: In a large mixing bowl, whisk together the melted butter and 2 cups of granulated sugar until well combined.
- Add eggs and vanilla: Beat in 4 large eggs, one at a time, followed by 2 teaspoons of vanilla extract. Mix until the batter is smooth and slightly glossy.
Step 3: Add the Dry Ingredients
- Sift dry ingredients: In a separate bowl, sift together 1 cup of unsweetened cocoa powder, 1 cup of all-purpose flour, ½ teaspoon of baking powder, and ¼ teaspoon of salt. Sifting prevents lumps and ensures even distribution.
- Combine wet and dry ingredients: Gradually add the dry ingredients to the wet mixture, stirring gently with a spatula or whisk. Mix until just combined—avoid overmixing to keep the brownies tender.
Step 4: Fold in Add-Ins
- Add nuts and chocolate chips: Gently fold in 1 cup of chopped pecans and ½ cup of chocolate chips (if using). This adds texture and extra flavor to the brownies.
Step 5: Bake the Brownies
- Spread the batter: Pour the batter into the prepared baking pan, spreading it evenly with a spatula.
- Bake: Place the pan in the preheated oven and bake for 25-30 minutes. The edges should be set, but the center should still be slightly soft.
Step 6: Add the Marshmallow Topping
- Sprinkle marshmallows: Once the brownies are almost done baking (around the 25-minute mark), remove them from the oven and quickly sprinkle 2 cups of mini marshmallows evenly over the top.
- Return to oven: Place the pan back in the oven for 2-3 minutes, or just until the marshmallows are puffed and golden. Watch closely to prevent burning.
Step 7: Cool and Slice
- Cool completely: Let the brownies cool in the pan for at least 30 minutes. This allows the marshmallow layer to set slightly.
- Slice and serve: Use a sharp knife to cut the brownies into squares. For clean slices, wipe the knife with a warm, damp cloth between cuts.
Pro Tip:
- Toothpick test: To check for doneness, insert a toothpick into the center of the brownies. It should come out with a few moist crumbs but not wet batter.
Video
Notes
- Calories: 320
-
Total Fat: 18g
- Saturated Fat: 9g
- Cholesterol: 70mg
- Sodium: 85mg
-
Total Carbohydrates: 38g
- Dietary Fiber: 2g
- Sugars: 28g
- Protein: 4g
FAQs
Here are answers to some common questions about Heavenly Hash Brownies and brownies in general. These FAQs will help you troubleshoot, customize, and enjoy your baking experience even more.
1. Which is better: brownie or cake?
It depends on your preference! Brownies are denser, fudgier, and richer, while cakes are lighter and fluffier. Brownies are perfect for chocolate lovers who crave a decadent, indulgent treat, while cakes are great for those who prefer a softer, airier texture.
2. What are the three types of brownies?
The three main types of brownies are:
–Fudgy: Dense, moist, and rich with a high fat-to-flour ratio.
–Cakey: Light and fluffy, with a texture similar to chocolate cake.
–Chewy: A balance between fudgy and cakey, with a slightly elastic texture.
Heavenly Hash Brownies fall into the fudgy category, with a gooey marshmallow topping for extra indulgence.
3. Why is my brownie not crispy on top?
A crispy top on brownies is often achieved by properly creaming the sugar and butter, which creates a thin, crackly crust. If your brownies aren’t crispy, it could be due to overmixing the batter, using too much liquid, or underbaking. For a crispier top, try whisking the sugar and eggs vigorously before adding the dry ingredients.
4. Which type of brownie is best?
The “best” type of brownie is subjective and depends on personal preference. Fudgy brownies are ideal for those who love rich, dense desserts, while cakey brownies are perfect for lighter, fluffier textures. Chewy brownies offer a middle ground. Heavenly Hash Brownies are best for anyone who loves a fudgy base with a gooey, marshmallow topping.
5. What makes brownies fudgy?
Fudgy brownies have a higher fat-to-flour ratio, often achieved by using more butter and chocolate and less flour. They also typically have fewer eggs than cakey brownies. The result is a dense, moist texture that’s rich and indulgent.
6. Do brownies need brown sugar?
Brownies don’t necessarily need brown sugar, but it can add moisture and a deeper flavor due to its molasses content. This recipe uses granulated sugar for a classic texture, but you can substitute half of it with brown sugar for a chewier, richer result.
7. Is brownie healthy to eat?
Brownies are a treat and should be enjoyed in moderation. While they’re not considered healthy due to their sugar and fat content, you can make healthier versions by using alternatives like almond flour, coconut sugar, or dark chocolate. However, Heavenly Hash Brownies are all about indulgence!
8. What is the old version of brownies?
The original brownie recipe dates back to the late 19th century and was more like a dense chocolate cake. Over time, recipes evolved to include less flour and more chocolate, resulting in the fudgy, chewy brownies we know and love today.
9. Can I eat a brownie every day?
While it’s tempting to enjoy brownies daily, they’re best enjoyed as an occasional treat due to their high sugar and calorie content. Balance indulgence with a healthy diet to enjoy brownies guilt-free.
10. Is brownie eaten hot or cold?
Brownies can be enjoyed both ways! Warm brownies are gooey and comforting, while cooled brownies have a firmer texture and are easier to slice. Heavenly Hash Brownies are delicious either way, but the marshmallow topping is especially gooey when served warm.