

If you love cookies ice cream, this Cookie Monster ice cream recipe will make you obsessed at first bite. Imagine creamy vanilla ice cream swirled with chunks of chocolate chip cookies, Oreos, or even pieces of edible cookie dough—all dyed a playful blue just like the beloved Sesame Street character.
This no-churn ice cream requires no special equipment—just a large bowl, a hand mixer, and your favorite mix-ins. The base comes together with heavy whipping cream and sweetened condensed milk, creating an ultra-rich, scoopable texture without an ice cream maker. Kids and adults alike go crazy for the fun color and loaded cookie pieces in every spoonful.
Whether you’re planning a birthday party or just craving a delicious homemade frozen treat, this recipe is easy to make and endlessly customizable. Swap Chips Ahoy for Oreos and chocolate chip, add extra cookie dough, or adjust the blue food coloring to your preferred shade. One taste of this perfect mashup of cookies and creamy ice cream, and you’ll understand why it’s called Cookie Monster ice cream—it’s downright irresistible.
Now, let’s grab our ingredients and make some magic happy in the kitchen!
Table of Contents
Key Benefits
What makes this Cookie Monster ice cream so special? Here’s why you’ll love this recipe from the very first scoop:
No Ice Cream Maker Needed
Skip the ice cream machine—this no-churn method uses simple kitchen tools. Just a large bowl, electric mixer, and your freezer are all you need to make this creamy ice cream.
Quick and Easy Prep
From mix to freeze, this recipe takes just 10 minutes of hands-on work. Whip the heavy whipping cream, fold in your favorite mix-ins, and let the freezer do the rest.
Customizable Cookie Load-Out
Use Oreos, chocolate chip cookies, or Chips Ahoy—or go wild with a combo. Want extra cookie dough chunks? Add them! The texture stays perfect either way.
Kid (and Adult) Approved
The vibrant blue color from blue food coloring makes this a hit at birthday parties, while the delicious mix of vanilla ice cream and cookie pieces satisfies all ages.
Freezer-Friendly for Weeks
Store it in an airtight container—it keeps its creamy texture for up to 2 weeks (if it lasts that long).
Ingredients

Here’s everything you’ll need to make this delicious Cookie Monster ice cream:
Ice Cream Base
- 2 cups heavy whipping cream (cold, for the creamiest ice cream texture)
- 1 can (14 oz) sweetened condensed milk (the secret to perfect no-churn ice cream)
- 1 teaspoon vanilla extract (for classic vanilla ice cream flavor)
- Blue food coloring (start with 5-6 drops, adjust for desired color)
Cookie Mix-Ins
- 1 cup chopped cookies (choose your favorite – Oreos, chocolate chip cookies, or Chips Ahoy)
- ½ cup edible cookie dough (optional, for extra indulgence)
Equipment
- Large bowl (for mixing)
- Hand mixer or stand mixer (to beat the heavy cream to stiff peaks form)
- Loaf pan or freezer-safe container (for freezing)
- Plastic wrap (to prevent ice crystals)
Pro Tip: For best results, chill your large bowl and beaters in the freezer for 15 minutes before whipping the heavy whipping cream. This helps achieve stiff peaks faster.
Optional Swaps:
- Swap Oreos for Chips Ahoy or your favorite store-bought cookies
- Use gluten-free cookies if needed
- Add ¼ cup mini chocolate chips for extra chocolate chip cookie flavor
Instructions
Follow these simple steps to create your Cookie Monster ice cream masterpiece:
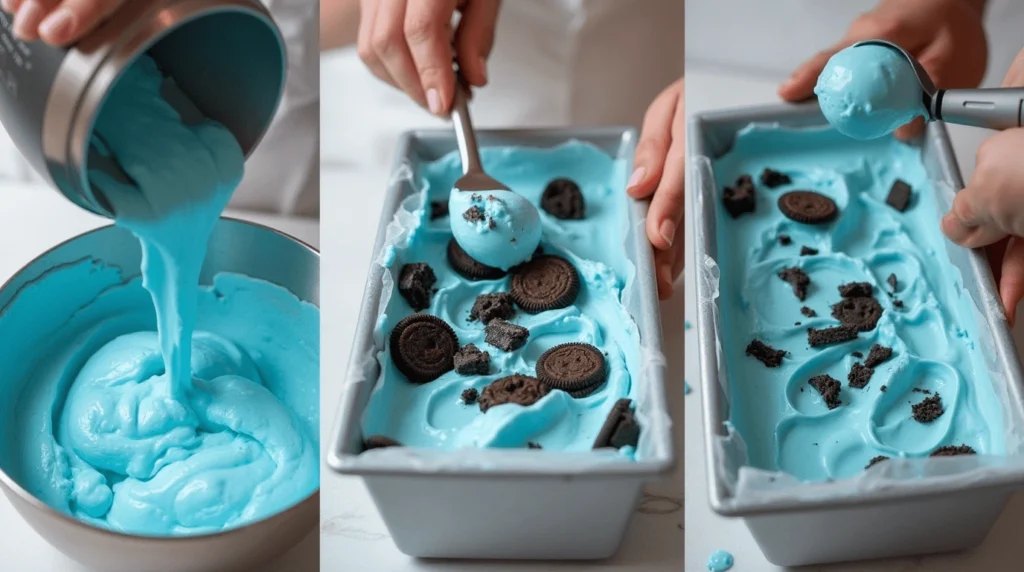
Step 1: Prepare the Cream Base
- Chill a large bowl and mixer beaters in the freezer for 15 minutes.
- Pour 2 cups heavy whipping cream into the cold bowl.
- Beat on high speed until stiff peaks form (about 3-4 minutes).
Step 2: Combine the Ice Cream Mixture
- Gently fold in 1 can sweetened condensed milk using a spatula.
- Add 1 teaspoon vanilla extract and blue food coloring (start with 5 drops).
- Continue mixing until the color is even and vibrant.
Step 3: Add Cookie Pieces
- Add 1 cup chopped cookies (Oreos, chocolate chip cookies, or Chips Ahoy).
- For extra richness, fold in ½ cup cookie dough chunks.
- Mix just until combined – don’t overwork the batter.
Step 4: Freeze to Perfection
- Transfer the ice cream mixture to a loaf pan or airtight container.
- Cover the surface with plastic wrap, pressing it directly onto the mixture.
- Freeze for at least 6 hours (overnight is best for ideal texture).
Step 5: Serve and Enjoy
- Let sit at room temperature for 5 minutes before scooping.
- Garnish with extra cookie pieces if desired.
- Store leftovers in the freezer for up to 2 weeks.
Troubleshooting Tips:
- If mixture won’t form stiff peaks, ensure your heavy cream is very cold
- For deeper blue color, add 1-2 more drops blue food coloring
- Prevent icy texture by pressing plastic wrap firmly on the surface
Pro Tips and Variations
Take your Cookie Monster ice cream to the next level with these expert suggestions:
Texture Tips
• For ultra-creamy ice cream, use heavy whipping cream with at least 36% fat content
• Ensure your heavy cream is ice-cold before beating – this helps stiff peaks form faster
• If your mixture gets too soft while mixing, place the bowl in the freezer for 15 minutes
Cookie Customizations
• Swap Oreos for Chips Ahoy or chocolate chip cookies for different flavor profiles
• Try using ½ cup cookie dough and ½ cup chopped cookies for varied texture
• For a cookies-and-cream effect, use all Oreos (filling included)
• Make it gluten-free by using your favorite GF cookies
Color Variations
• Adjust the blue food coloring intensity – more drops for electric blue, fewer for pastel
• Create a marbled effect by not fully mixing in the coloring
• For special occasions, layer with white vanilla ice cream mixture
Storage Solutions
• Press plastic wrap directly on the surface before freezing to prevent ice crystals
• Use an airtight container for long-term storage (up to 2 weeks)
• For single servings, freeze in muffin tins with paper liners
Advanced Techniques
• For richer flavor, toast your cookie pieces for 5 minutes at 350°F before adding
• Incorporate 1 tablespoon instant pudding mix for extra creaminess
• Add ¼ teaspoon almond extract to enhance the vanilla ice cream base
Special Occasion Ideas
• Perfect for Sesame Street themed birthday parties
• Serve in ice cream cones with cookie monster faces piped in frosting
• Create an ice cream bar with various cookie pieces and toppings
Serving Suggestions
Transform your Cookie Monster ice cream into show-stopping desserts with these creative ideas:
Classic Presentations
- Scoop into waffle cones and press chocolate chip cookies around the edges for “fur”
- Serve in colorful bowls with Oreo crumbs sprinkled on top for a dirt effect
- For birthday parties, layer with crushed Chips Ahoy in parfait glasses
Elevated Dessert Ideas
- Create an ice cream sandwich using two chocolate chip cookies
- Top warm brownies with a scoop and drizzle with chocolate syrup
- Make a Cookie Monster sundae with whipped cream and candy eyes
Special Occasion Twists
- For Sesame Street parties, serve with blue sprinkles and cookie “eyes”
- Package in small jars with ribbon for party favors
- Layer with crumbled cookies in a trifle dish for group servings
Adult Versions
- Add a tablespoon of Kahlúa to the ice cream mixture before freezing
- Drizzle with bourbon caramel sauce when serving
- Mix in chopped chocolate-covered espresso beans
Kid-Friendly Options
- Let children decorate their scoops with various cookie pieces
- Serve in mini cups with popsicle sticks for ice cream pops
- Create “monster faces” using cookies and candy eyes
Pro Serving Tip:
For perfect scoops every time, run your ice cream scoop under hot water before serving. This works especially well with the creamy ice cream texture of this no-churn recipe.
Conclusion
This Cookie Monster ice cream recipe proves that magical desserts don’t require fancy equipment or complicated techniques. With just heavy whipping cream, sweetened condensed milk, and your favorite cookies, you’ve created a delicious frozen treat that captures the playful spirit of Sesame Street in every scoop.
The beauty of this no-churn ice cream lies in its versatility. Whether you used Oreos, chocolate chip cookies, or Chips Ahoy, each variation brings its own delightful texture and flavor. That vibrant blue color from the blue food coloring makes it instantly recognizable, while the creamy ice cream base ensures every bite melts perfectly on your tongue.
Remember:
• The easy method works because cold heavy cream whipped to stiff peaks form creates the ideal structure
• Freezing with plastic wrap pressed directly on the surface maintains that scoopable quality
• Customizing with different cookie pieces or cookie dough makes it your own
Whether served at birthday parties, as a weekend treat, or just because you wanted something sweet, this homemade creation beats store-bought versions in both flavor and fun. Now that you’ve mastered the basic recipe, feel free to experiment with new mix-ins and colors.
One taste of this perfect frozen dessert, and you’ll understand why we warned it might become obsessive. The combination of vanilla ice cream goodness with crunchy cookie pieces is simply irresistible. So grab your container, make another batch, and keep the freezer stocked with this Cookie Monster-approved delight!
__________________________________________________

cookie monster ice cream
Ingredients
Ice Cream Base
- 2 cups heavy whipping cream cold, for the creamiest ice cream texture
- 1 can 14 oz sweetened condensed milk (the secret to perfect no-churn ice cream)
- 1 teaspoon vanilla extract for classic vanilla ice cream flavor
- Blue food coloring start with 5-6 drops, adjust for desired color
Cookie Mix-Ins
- 1 cup chopped cookies choose your favorite – Oreos, chocolate chip cookies, or Chips Ahoy
- ½ cup edible cookie dough optional, for extra indulgence
Instructions
Step 1: Prepare the Cream Base
- Chill a large bowl and mixer beaters in the freezer for 15 minutes.
- Pour 2 cups heavy whipping cream into the cold bowl.
- Beat on high speed until stiff peaks form (about 3-4 minutes).
Step 2: Combine the Ice Cream Mixture
- Gently fold in 1 can sweetened condensed milk using a spatula.
- Add 1 teaspoon vanilla extract and blue food coloring (start with 5 drops).
- Continue mixing until the color is even and vibrant.
Step 3: Add Cookie Pieces
- Add 1 cup chopped cookies (Oreos, chocolate chip cookies, or Chips Ahoy).
- For extra richness, fold in ½ cup cookie dough chunks.
- Mix just until combined – don’t overwork the batter.
Step 4: Freeze to Perfection
- Transfer the ice cream mixture to a loaf pan or airtight container.
- Cover the surface with plastic wrap, pressing it directly onto the mixture.
- Freeze for at least 6 hours (overnight is best for ideal texture).
Step 5: Serve and Enjoy
- Let sit at room temperature for 5 minutes before scooping.
- Garnish with extra cookie pieces if desired.
- Store leftovers in the freezer for up to 2 weeks.
Notes
| Nutrient | Amount |
|---|---|
| Calories | 320 kcal |
| Total Fat | 18g |
| Saturated Fat | 11g |
| Protein | 4g |
| Carbohydrates | 35g |
| Sugar | 28g |
| Fiber | 1g |
| Cholesterol | 55mg |
| Sodium | 120mg |
FAQs
What is Cookie Monster ice cream flavor?
This Cookie Monster ice cream features a sweet vanilla ice cream base packed with chunks of chocolate chip cookies, Oreos, or Chips Ahoy for a cookies-and-cream style flavor. The addition of cookie dough (optional) makes it even more decadent.
Why is Cookie Monster ice cream blue?
The vibrant blue color comes from blue food coloring, matching the iconic look of the Sesame Street character. Adjust the amount of coloring to achieve your preferred shade.
What flavor is afters Cookie Monster?
The primary flavor is sweet vanilla ice cream combined with the taste of mixed cookie pieces. The blue food coloring doesn’t affect the flavor – it’s purely for visual appeal.
What is Cookie Monster made of?
This homemade version contains:
– Heavy whipping cream (for the creamy ice cream base)
– Sweetened condensed milk (for sweetness and smooth texture)
– Vanilla extract (for classic flavor)
– Blue food coloring (for the signature color)
– Chopped cookies (Oreos, chocolate chip cookies, or Chips Ahoy)
Can I make this without an ice cream maker?
Absolutely! This is specifically a no-churn ice cream recipe, meaning you only need a large bowl, mixer, and your freezer. No ice cream machine required.
How long does it need to freeze?
For best results, freeze the ice cream mixture for at least 6 hours in a covered container. Overnight freezing ensures the perfect firm yet scoopable texture.
Can I use different cookies?
Yes! Feel free to swap any of your favorite cookies. Just maintain about 1 cup total of cookie pieces for ideal texture.
How should I store leftovers?
Keep in an airtight container with plastic wrap pressed directly on the surface. It stays fresh in the freezer for up to 2 weeks.
Is this recipe kid-friendly?
Yes! Children love helping mix in the cookie pieces and watching the color change. It’s perfect for birthday parties or Sesame Street themed events.
Can I make this ahead for a party?
Definitely. Prepare 1-2 days in advance – the freezing process actually improves the texture. Just remember to let it sit at room temperature for 5 minutes before scooping.