

Brownie cake pops are the ultimate treat for anyone who loves the rich, fudgy goodness of brownies combined with the fun, bite-sized appeal of cake pops. These delightful little bites are perfect for parties, holidays, or just as a sweet indulgence to brighten your day. Whether you’re a seasoned baker or a beginner in the kitchen, this recipe is simple, approachable, and guaranteed to impress.
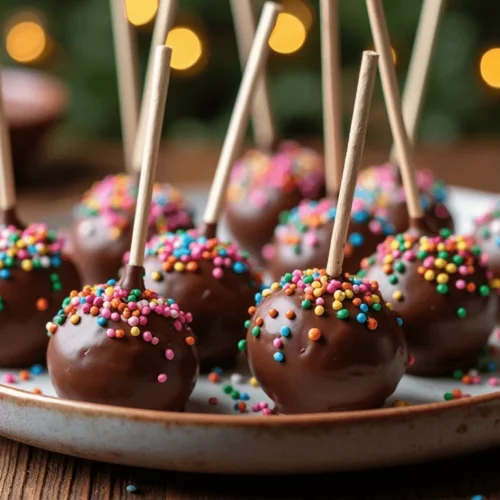
Imagine sinking your teeth into a soft, chocolatey brownie center, coated in a smooth layer of melted chocolate, and topped with colorful sprinkles. Brownie cake pops are not only delicious but also versatile. You can customize them with different coatings, toppings, and flavors to suit any occasion. Plus, they’re easy to make ahead of time and store, making them a convenient option for busy hosts or last-minute dessert cravings.
In this guide, we’ll walk you through everything you need to know to create perfect brownie cake pops at home. From the essential ingredients to step-by-step instructions, pro tips, and creative variations, you’ll find all the information you need to make these irresistible treats. Let’s get started and bring these delicious bites to life!
Table of Contents
Key Benefits
Brownie cake pops aren’t just a treat for your taste buds—they come with a host of benefits that make them a standout dessert choice. Here’s why you’ll love making and serving these delightful bites:
- Perfect Portion Control: Brownie cake pops are bite-sized, making them an ideal dessert for parties or gatherings. They’re easy to serve and enjoy without the mess of slicing a cake or brownie pan.
- Kid-Friendly and Fun: These pops are a hit with kids and adults alike. Their playful appearance, colorful coatings, and sprinkles make them a festive addition to birthdays, holidays, or any celebration.
- Customizable: Whether you prefer milk chocolate, dark chocolate, or even white chocolate coatings, brownie cake pops can be tailored to your taste. Add sprinkles, crushed nuts, or drizzle with contrasting chocolate for a personalized touch.
- Great for Leftovers: Have leftover brownies? Transform them into cake pops! This recipe is a fantastic way to repurpose stale or extra brownies into a fresh, exciting dessert.
- Easy to Make Ahead: Brownie cake pops can be prepared in advance and stored in the refrigerator or freezer. This makes them a convenient option for busy hosts or last-minute dessert needs.
- Portable and Mess-Free: Unlike traditional cakes or brownies, cake pops are easy to transport and serve. They’re perfect for picnics, school events, or as a sweet gift.
- Crowd-Pleasing: With their rich, chocolatey flavor and eye-catching presentation, brownie cake pops are guaranteed to be a hit at any event. They’re a unique twist on traditional desserts that will leave your guests asking for more.
By making brownie cake pops, you’re not just creating a dessert—you’re crafting an experience. They’re fun to make, delicious to eat, and versatile enough to suit any occasion. Ready to dive into the recipe? Let’s gather the ingredients and get started!
Ingredients
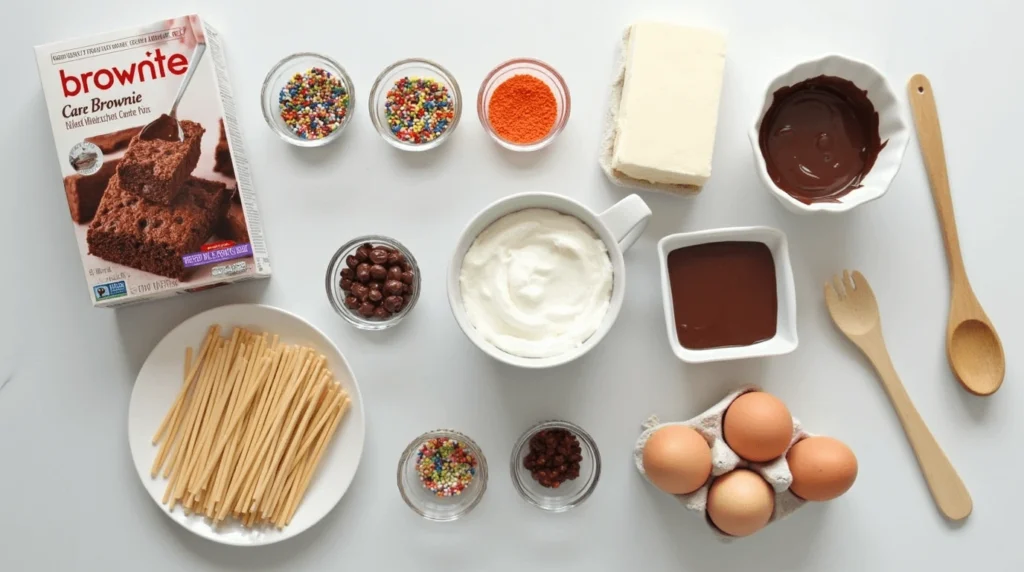
To make these irresistible brownie cake pops, you’ll need a handful of simple ingredients. Most of these are pantry staples or easy to find at your local grocery store. Here’s what you’ll need:
For the Brownie Base:
- 1 box of brownie mix (or your favorite homemade brownie recipe)
- Ingredients listed on the brownie mix box (typically eggs, oil, and water)
For Binding the Cake Pops:
- 4 ounces cream cheese, softened (or frosting of your choice)
For Coating and Decorating:
- 2 cups chocolate candy melts (milk, dark, or white chocolate)
- 1 tablespoon coconut oil or shortening (optional, for smoother melting)
- Sprinkles, crushed nuts, or other toppings (for decoration)
Additional Tools:
- Lollipop sticks
- Styrofoam block or cake pop stand (for drying)
- Parchment paper or wax paper
- Cookie scoop or tablespoon
- Microwave-safe bowl
- Baking sheet
Optional Variations:
- Peanut butter: Add 2 tablespoons of peanut butter to the brownie mixture for a nutty twist.
- Mint extract: Mix in 1/2 teaspoon of mint extract for a refreshing flavor.
- Colored candy melts: Use vibrant colors for themed occasions like birthdays or holidays.
Why These Ingredients Work:
- Brownie Mix: Using a boxed mix saves time, but homemade brownies work just as well for a richer flavor.
- Cream Cheese: This binds the brownie crumbs together, adding a subtle tanginess and creamy texture.
- Candy Melts: They melt smoothly and harden quickly, making them perfect for coating cake pops.
- Sprinkles and Toppings: These add a fun, colorful finish that makes the pops visually appealing.
With these ingredients on hand, you’re ready to create delicious brownie cake pops that everyone will love. Let’s move on to the step-by-step instructions to bring this recipe to life!
Instructions
Making brownie cake pops is easier than you might think! Follow these step-by-step instructions to create perfectly shaped, delicious, and visually stunning treats:
Step 1: Bake the Brownies
- Preheat your oven according to the instructions on the brownie mix box (usually 350°F or 175°C).
- Prepare the brownie batter as directed on the box or using your homemade recipe.
- Pour the batter into a greased or parchment-lined baking pan and bake until a toothpick inserted into the center comes out with a few moist crumbs (about 25-30 minutes).
- Allow the brownies to cool completely in the pan.
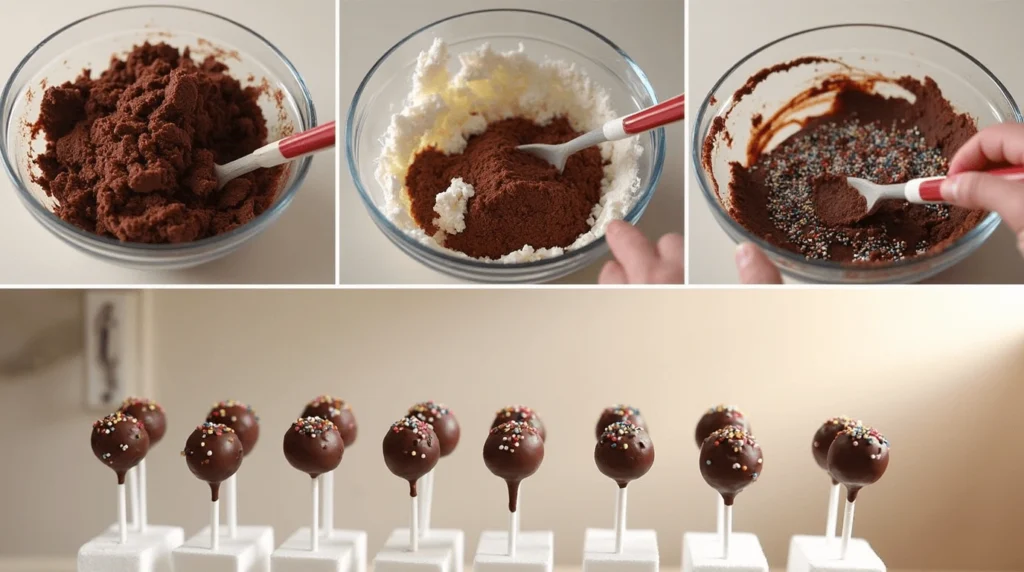
Step 2: Crumble the Brownies
- Once cooled, transfer the brownies to a large bowl.
- Use your hands or a fork to crumble the brownies into fine, even crumbs. Ensure there are no large chunks.
Step 3: Bind the Crumbs
- Add the softened cream cheese (or frosting) to the brownie crumbs.
- Mix thoroughly until the mixture holds together when pressed. It should feel like a dough but still be moist and fudgy.
Step 4: Shape the Cake Pops
- Use a cookie scoop or tablespoon to portion the mixture into equal-sized balls (about 1-1.5 inches in diameter).
- Roll each portion between your palms to form smooth, round balls.
- Place the balls on a parchment-lined baking sheet.
- Insert a lollipop stick into each ball, pushing it about halfway through.
- Chill the cake pops in the refrigerator for 20-30 minutes or in the freezer for 10-15 minutes to firm them up.
Step 5: Melt the Chocolate
- In a microwave-safe bowl, combine the candy melts and coconut oil (if using).
- Microwave in 30-second intervals, stirring after each interval, until the chocolate is smooth and fully melted.
Step 6: Coat the Cake Pops
- Remove the cake pops from the refrigerator or freezer.
- Dip each cake pop into the melted chocolate, swirling gently to coat evenly. Allow any excess chocolate to drip back into the bowl.
- While the chocolate is still wet, add sprinkles or other toppings.
- Place the coated cake pops upright in a styrofoam block or cake pop stand to dry.
Step 7: Let Them Set
- Allow the chocolate coating to harden completely at room temperature (about 15-20 minutes).
- If you’re in a hurry, you can place them in the refrigerator for 5-10 minutes to speed up the process.
Step 8: Serve and Enjoy
- Once the chocolate has set, your brownie cake pops are ready to serve!
- Store any leftovers in an airtight container at room temperature or in the refrigerator for up to 5 days.
Pro Tips and Variations
To help you master the art of making brownie cake pops, here are some expert tips and creative variations to elevate your dessert game:
Pro Tips for Perfect Brownie Cake Pops
- Use Room Temperature Ingredients: Ensure your cream cheese is softened and at room temperature before mixing. This helps it blend smoothly with the brownie crumbs.
- Chill Before Dipping: Always chill the shaped cake pops before dipping them in chocolate. This prevents them from falling apart and helps the coating set faster.
- Smooth Chocolate Coating: Add a small amount of coconut oil or shortening to the candy melts for a smoother, glossier finish.
- Tap Off Excess Chocolate: After dipping, gently tap the stick against the side of the bowl to remove excess chocolate. This prevents drips and ensures an even coating.
- Use a Styrofoam Block: Insert the cake pops into a styrofoam block to dry upright. This keeps them from touching any surfaces and maintains their shape.
- Work in Batches: If the cake pops start to soften while dipping, return them to the refrigerator or freezer for a few minutes to firm up again.
- Double Dip for Thicker Coating: For a thicker chocolate layer, let the first coat harden completely, then dip the cake pops a second time.
Creative Variations
- Flavor Twists:
- Add 1-2 tablespoons of peanut butter to the brownie mixture for a nutty flavor.
- Mix in 1/2 teaspoon of mint extract or orange zest for a refreshing twist.
- Coatings:
- Use white chocolate, dark chocolate, or colored candy melts for different looks.
- Drizzle melted chocolate in a contrasting color over the coated cake pops for a decorative effect.
- Toppings:
- Roll the coated cake pops in crushed nuts, shredded coconut, or cookie crumbs for added texture.
- Use themed sprinkles for holidays or special occasions.
- No-Bake Option:
- Use store-bought brownies or leftover brownies to skip the baking step entirely.
- Mini Cake Pops:
- Make smaller cake pops for bite-sized treats by using a teaspoon to portion the mixture.
- Gluten-Free or Vegan:
- Use gluten-free brownie mix and vegan cream cheese or frosting for dietary-friendly options.
Troubleshooting Common Issues
- Cake Pops Falling Apart: If the mixture is too dry, add a bit more cream cheese or frosting. If it’s too wet, chill it longer before shaping.
- Cracked Coating: Ensure the cake pops are fully chilled before dipping, and avoid overhandling them.
- Lumpy Chocolate: Melt the candy melts slowly and stir thoroughly to achieve a smooth consistency.
With these tips and variations, you can customize your brownie cake pops to suit any occasion or preference. Let’s move on to serving suggestions to make your dessert even more special!
Serving Suggestions
Brownie cake pops are not only delicious but also incredibly versatile when it comes to serving and presentation. Here are some creative ideas to make your dessert stand out:
1. Party Platter
- Arrange the cake pops on a decorative platter or cake stand.
- Group them by color or topping for a visually appealing display.
- Add edible glitter or gold dust for a touch of elegance.
2. Gift Ideas
- Wrap individual cake pops in clear cellophane bags tied with ribbons.
- Place them in a small box lined with tissue paper for a thoughtful homemade gift.
- Attach a personalized tag or label for special occasions like birthdays or holidays.
3. Dessert Table Centerpiece
- Insert the cake pops into a styrofoam block covered with decorative paper or fabric.
- Create a themed display, such as a “chocolate forest” with green-colored pops for a holiday party.
- Add other desserts like cupcakes or cookies to complement the cake pops.
4. Kids’ Parties
- Use colorful candy melts and fun sprinkles to match the party theme.
- Place the cake pops in a decorated bucket or jar for easy grabbing.
- Let kids decorate their own cake pops with toppings and drizzles for a fun activity.
5. Holiday Themes
- For Christmas, use red and green coatings with festive sprinkles.
- For Halloween, create spooky designs with orange and black candy melts.
- For Valentine’s Day, dip the pops in pink or red chocolate and add heart-shaped sprinkles.
6. Dessert Pairings
- Serve the cake pops with a side of fresh berries or whipped cream for a refreshing contrast.
- Pair them with a glass of milk, coffee, or hot chocolate for a cozy treat.
- Offer a variety of dips, such as caramel sauce or melted peanut butter, for extra indulgence.
7. Buffet or Potluck Style
- Place the cake pops in a tiered stand for easy access.
- Label different flavors or toppings to help guests choose their favorites.
- Provide small bags or napkins for guests to take extras home.
8. Special Occasions
- Use metallic or pastel-colored coatings for weddings or baby showers.
- Add edible flowers or gold leaf for a luxurious touch.
- Create a custom display with the recipient’s name or initials using cake pops.
With these serving suggestions, your brownie cake pops will not only taste amazing but also look stunning and fit perfectly into any event or celebration. Let’s wrap up with a conclusion and answer some frequently asked questions!
Conclusion
Brownie cake pops are a delightful fusion of rich, fudgy brownies and the fun, portable appeal of cake pops. They’re perfect for any occasion, from birthday parties and holidays to casual gatherings or even as a sweet treat for yourself. With their customizable coatings, toppings, and flavors, these bite-sized desserts offer endless possibilities to suit your taste and creativity.
This recipe is designed to be simple and approachable, whether you’re a baking novice or a seasoned pro. By following the step-by-step instructions, pro tips, and serving suggestions, you’ll be able to create stunning and delicious brownie cake pops that everyone will love. Plus, their make-ahead convenience and crowd-pleasing nature make them a go-to dessert for busy hosts and dessert enthusiasts alike.
So, grab your ingredients, roll up your sleeves, and get ready to make these irresistible treats. Whether you’re sharing them with friends, gifting them to loved ones, or enjoying them solo, brownie cake pops are sure to bring a smile to your face. Happy baking!
__________________________________________________
brownie cake pops
Ingredients
For the Brownie Base:
- 1 box of brownie mix or your favorite homemade brownie recipe
- Ingredients listed on the brownie mix box typically eggs, oil, and water
For Binding the Cake Pops:
- 4 ounces cream cheese softened (or frosting of your choice)
For Coating and Decorating:
- 2 cups chocolate candy melts milk, dark, or white chocolate
- 1 tablespoon coconut oil or shortening optional, for smoother melting
- Sprinkles crushed nuts, or other toppings (for decoration)
Additional Tools:
- Lollipop sticks
- Styrofoam block or cake pop stand for drying
- Parchment paper or wax paper
- Cookie scoop or tablespoon
- Microwave-safe bowl
- Baking sheet
Optional Variations:
- Peanut butter: Add 2 tablespoons of peanut butter to the brownie mixture for a nutty twist.
- Mint extract: Mix in 1/2 teaspoon of mint extract for a refreshing flavor.
- Colored candy melts: Use vibrant colors for themed occasions like birthdays or holidays.
Why These Ingredients Work:
- Brownie Mix: Using a boxed mix saves time but homemade brownies work just as well for a richer flavor.
- Cream Cheese: This binds the brownie crumbs together adding a subtle tanginess and creamy texture.
- Candy Melts: They melt smoothly and harden quickly making them perfect for coating cake pops.
- Sprinkles and Toppings: These add a fun colorful finish that makes the pops visually appealing.
Instructions
Step 1: Bake the Brownies
- Preheat your oven according to the instructions on the brownie mix box (usually 350°F or 175°C).
- Prepare the brownie batter as directed on the box or using your homemade recipe.
- Pour the batter into a greased or parchment-lined baking pan and bake until a toothpick inserted into the center comes out with a few moist crumbs (about 25-30 minutes).
- Allow the brownies to cool completely in the pan.
Step 2: Crumble the Brownies
- Once cooled, transfer the brownies to a large bowl.
- Use your hands or a fork to crumble the brownies into fine, even crumbs. Ensure there are no large chunks.
Step 3: Bind the Crumbs
- Add the softened cream cheese (or frosting) to the brownie crumbs.
- Mix thoroughly until the mixture holds together when pressed. It should feel like a dough but still be moist and fudgy.
Step 4: Shape the Cake Pops
- Use a cookie scoop or tablespoon to portion the mixture into equal-sized balls (about 1-1.5 inches in diameter).
- Roll each portion between your palms to form smooth, round balls.
- Place the balls on a parchment-lined baking sheet.
- Insert a lollipop stick into each ball, pushing it about halfway through.
- Chill the cake pops in the refrigerator for 20-30 minutes or in the freezer for 10-15 minutes to firm them up.
Step 5: Melt the Chocolate
- In a microwave-safe bowl, combine the candy melts and coconut oil (if using).
- Microwave in 30-second intervals, stirring after each interval, until the chocolate is smooth and fully melted.
Step 6: Coat the Cake Pops
- Remove the cake pops from the refrigerator or freezer.
- Dip each cake pop into the melted chocolate, swirling gently to coat evenly. Allow any excess chocolate to drip back into the bowl.
- While the chocolate is still wet, add sprinkles or other toppings.
- Place the coated cake pops upright in a styrofoam block or cake pop stand to dry.
Step 7: Let Them Set
- Allow the chocolate coating to harden completely at room temperature (about 15-20 minutes).
- If you’re in a hurry, you can place them in the refrigerator for 5-10 minutes to speed up the process.
Step 8: Serve and Enjoy
- Once the chocolate has set, your brownie cake pops are ready to serve!
- Store any leftovers in an airtight container at room temperature or in the refrigerator for up to 5 days.
Notes
- Calories: 150
-
Total Fat: 8g
- Saturated Fat: 4g
- Cholesterol: 10mg
- Sodium: 60mg
-
Total Carbohydrates: 18g
- Dietary Fiber: 1g
- Sugars: 14g
- Protein: 2g
FAQs
Here are answers to some common questions about making brownie cake pops:
1. Can I use brownies for cake pops?
Yes, absolutely! Brownies work wonderfully for cake pops. Their dense, fudgy texture makes them easy to crumble and shape into balls. You can use homemade brownies or a boxed mix—both work great.
2. What is the trick to making cake pops?
The key to perfect cake pops is ensuring the mixture is moist enough to hold together but not too wet. Use cream cheese or frosting to bind the crumbs, and chill the shaped pops before dipping them in chocolate. This helps them stay firm and prevents cracking
3. What is the difference between cake pops and cake balls?
Cake pops are cake balls placed on sticks, making them easier to hold and serve. Cake balls are simply the round, coated treats without the sticks. Both are delicious, but cake pops are more fun and portable.
4. Why are my cake pops falling apart when I dip them in chocolate?
This usually happens if the cake pops aren’t chilled enough or the mixture is too dry. Make sure to chill the pops thoroughly before dipping, and add a bit more cream cheese or frosting if the mixture feels crumbly.
5. What not to do when making cake pops?
-Don’t skip chilling the cake pops before dipping.
-Don’t overheat the chocolate, as it can become lumpy or too thick.
-Don’t rush the process—take your time to ensure each step is done correctly.
6. Is it better to overcook or undercook brownies for cake pops?
It’s better to slightly undercook the brownies. They should be moist and fudgy, as dry or overcooked brownies can make the cake pops crumbly and hard to shape. A toothpick inserted into the brownies should come out with a few moist crumbs.