

Who doesn’t love the irresistible combo of crispy chicken tenders and golden fries? Whether it’s a cozy family dinner, a game-day snack, or a quick meal that satisfies even the pickiest eaters, this classic duo never fails to hit the spot. Imagine tender, juicy chicken coated in a perfectly seasoned crunch, paired with fries that are crispy on the outside and fluffy on the inside-all made right in your kitchen.
The best part? This homemade version is not only easy to whip up but also lets you control the ingredients, making it a healthier alternative to store-bought or fast-food options. Plus, it’s incredibly versatile! Want to spice things up? Add a kick of heat to the seasoning. Prefer a gluten-free option? Swap in your favorite breadcrumbs. The possibilities are endless.
So, are you ready to create your new favorite comfort food duo? Let’s dive into this simple, crowd-pleasing recipe that’s sure to become a regular on your menu. Trust me, once you try these chicken tenders and fries, you’ll never look back!
Table of Contents
Key Benefits
When it comes to comfort food, few things can beat the classic pairing of crispy chicken tenders and golden fries. But why settle for takeout when you can make this beloved duo at home? Here’s why this recipe is a game-changer:
- Healthier Homemade Goodness: By making your own chicken tenders and fries, you control the ingredients. Skip the preservatives and excess oil often found in restaurant versions, and opt for fresh, wholesome choices.
- Kid-Approved and Family-Friendly: This meal is a surefire hit with kids and adults alike. The familiar flavors and fun, finger-food style make it perfect for family dinners or casual gatherings.
- Quick and Easy: With simple steps and minimal prep, this recipe is ideal for busy weeknights. In under an hour, you’ll have a satisfying meal on the table.
- Endlessly Customizable: Whether you prefer spicy seasoning, gluten-free breadcrumbs, or a mix of herbs, this recipe adapts to your tastes. Plus, you can experiment with different dipping sauces for extra flair.
- Budget-Friendly: Making chicken tenders and fries at home is not only delicious but also cost-effective. A single batch can feed a crowd without breaking the bank.
This homemade version brings all the crispy, golden perfection you crave, with the added bonus of knowing exactly what’s on your plate. Ready to get started? Let’s move on to the step-by-step guide!
How to Make Chicken Tenders and Fries

Creating the perfect chicken tenders and fries at home is easier than you think! With a few simple steps and some handy tips, you’ll achieve that crispy, golden goodness everyone loves. Here’s how to make this crowd-pleasing duo:
Ingredients You’ll Need:
For the Chicken Tenders:
- 1 lb chicken breast, cut into strips
- 1 cup breadcrumbs (regular or panko for extra crunch)
- ½ cup all-purpose flour (or gluten-free alternative)
- 2 eggs, beaten
- 1 tsp paprika
- 1 tsp garlic powder
- 1 tsp onion powder
- Salt and pepper to taste
- Cooking spray or oil for baking
For the Fries:
- 2 large russet potatoes, cut into thin strips
- 2 tbsp olive oil
- 1 tsp smoked paprika (optional)
- Salt and pepper to taste
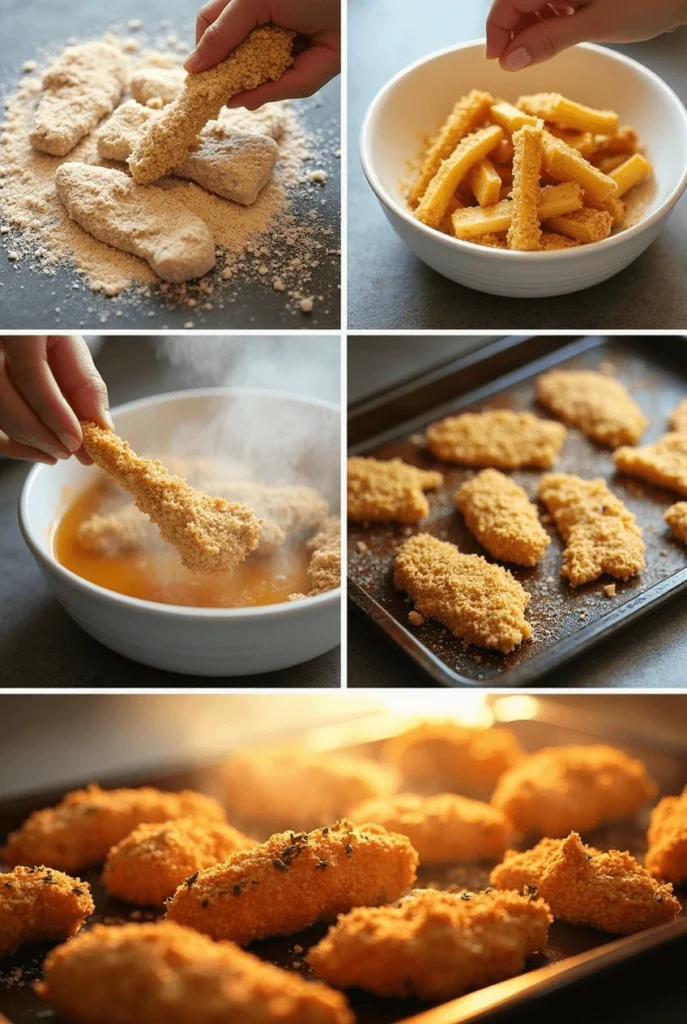
Step-by-Step Instructions:
- Prep the Chicken Tenders:
- Pat the chicken strips dry with a paper towel to ensure the coating sticks well.
- In three separate bowls, set up your breading station: one with flour, one with beaten eggs, and one with breadcrumbs mixed with paprika, garlic powder, onion powder, salt, and pepper.
- Dip each chicken strip into the flour, then the egg, and finally the breadcrumb mixture, pressing gently to coat evenly.
- Prepare the Fries:
- Preheat your oven to 425°F (220°C).
- Soak the potato strips in cold water for 10 minutes to remove excess starch, then pat them dry thoroughly.
- Toss the fries with olive oil, smoked paprika (if using), salt, and pepper until evenly coated.
- Cook to Perfection:
- Arrange the chicken tenders and fries on a baking sheet lined with parchment paper or a silicone mat. Make sure they’re spaced out to allow even cooking.
- Lightly spray the chicken tenders with cooking spray or brush them with oil for extra crispiness.
- Bake for 20-25 minutes, flipping halfway through, until the chicken is golden brown and cooked through (internal temperature of 165°F) and the fries are crispy.
- Serve and Enjoy:
- Let the chicken tenders and fries cool slightly before serving. Pair them with your favorite dipping sauces like ranch, BBQ, or honey mustard for an extra flavor boost.
Pro Tip:
For an even crispier texture, try using an air fryer! Cook the chicken tenders at 375°F (190°C) for 12-15 minutes and the fries for 15-20 minutes, shaking the basket halfway through.
Instructions
Now that you’ve prepped your ingredients, it’s time to bring your chicken tenders and fries to life! Follow these easy, step-by-step instructions to ensure crispy, golden perfection every time.
Step 1: Prep the Chicken Tenders
- Dry the Chicken: Pat the chicken strips dry with a paper towel. This helps the coating stick better and ensures a crispier finish.
- Set Up Your Breading Station:
- Bowl 1: Place the flour.
- Bowl 2: Beat the eggs until smooth.
- Bowl 3: Mix the breadcrumbs with paprika, garlic powder, onion powder, salt, and pepper.
- Coat the Chicken:
- Dip each chicken strip into the flour, shaking off any excess.
- Next, dip it into the beaten eggs, letting any extra drip off.
- Finally, press it into the breadcrumb mixture, ensuring an even, generous coating.
Step 2: Prepare the Fries
- Soak the Potatoes: After cutting the potatoes into thin strips, soak them in cold water for 10 minutes. This removes excess starch and helps achieve that perfect crispy texture.
- Dry Thoroughly: Drain the potatoes and pat them completely dry with a clean kitchen towel or paper towels. Any moisture left can prevent them from crisping up.
- Season the Fries: Toss the dried potato strips with olive oil, smoked paprika (if using), salt, and pepper until evenly coated.
Step 3: Bake to Golden Perfection
- Preheat the Oven: Set your oven to 425°F (220°C) and line a baking sheet with parchment paper or a silicone mat for easy cleanup.
- Arrange on the Baking Sheet:
- Place the breaded chicken tenders on one side of the sheet, leaving space between each piece for even cooking.
- Spread the seasoned fries on the other side, ensuring they’re in a single layer.
- Cook:
- Lightly spray the chicken tenders with cooking spray or brush them with oil for extra crispiness.
- Bake for 20-25 minutes, flipping the chicken and fries halfway through. The chicken is done when it reaches an internal temperature of 165°F, and the fries should be golden and crispy.
Step 4: Serve and Enjoy
- Let It Rest: Allow the chicken tenders and fries to cool for a few minutes before serving. This helps the coating set and keeps the chicken juicy.
- Add Your Favorite Dips: Serve with classic dipping sauces like ketchup, ranch, BBQ, or honey mustard for an extra layer of flavor.
- Garnish (Optional): Sprinkle fresh parsley or grated Parmesan over the fries for a gourmet touch.
Quick Tip:
If you’re short on time, you can prep the chicken tenders and fries ahead of time. Store the breaded chicken and seasoned fries separately in the fridge for up to 2 hours before baking.
Pro Tips and Variations
Want to take your chicken tenders and fries to the next level? Whether you’re looking to switch up the flavors, cater to dietary needs, or simply perfect your technique, these pro tips and variations will help you customize this recipe like a pro.
Pro Tips for Perfect Chicken Tenders and Fries:
- For Extra Crispy Chicken:
- Double-coat the chicken by dipping it in the egg and breadcrumb mixture twice. This creates a thicker, crunchier crust.
- Let the breaded chicken rest on a wire rack for 10 minutes before baking. This helps the coating adhere better.
- For Perfectly Crispy Fries:
- Soak the potato strips in cold water for at least 30 minutes (or up to 2 hours) to remove even more starch.
- Toss the fries in cornstarch before adding oil and seasoning. This adds an extra layer of crispiness.
- Use an Air Fryer:
- Cook the chicken tenders at 375°F (190°C) for 12-15 minutes and the fries for 15-20 minutes, shaking the basket halfway through. This method reduces oil and delivers a satisfying crunch.
- Don’t Overcrowd the Pan:
- Whether baking or air frying, make sure the chicken and fries have plenty of space. Overcrowding can lead to steaming instead of crisping.
Delicious Variations to Try:
- Spicy Kick:
- Add cayenne pepper, chili powder, or hot sauce to the breadcrumb mixture for a fiery twist.
- Serve with a spicy mayo or sriracha dip.
- Gluten-Free Option:
- Use gluten-free breadcrumbs or crushed cornflakes for the chicken coating.
- Ensure your flour and seasoning blends are gluten-free certified.
- Cheesy Fries:
- Sprinkle shredded cheddar or Parmesan over the fries during the last 5 minutes of baking.
- Add a drizzle of garlic butter for extra indulgence.
- Herb-Infused Flavor:
- Mix dried herbs like thyme, rosemary, or oregano into the breadcrumb coating for a fragrant, gourmet touch.
- Sweet Potato Fries:
- Swap regular potatoes for sweet potatoes for a healthier, slightly sweet alternative.
- Season with cinnamon and paprika for a unique flavor combo.
- Dipping Sauce Ideas:
- Classic: Ketchup, ranch, or honey mustard.
- Gourmet: Garlic aioli, sriracha mayo, or tangy BBQ sauce.
- Sweet: Maple mustard or spicy honey glaze.
Meal Prep and Storage Tips:
- Make Ahead: Bread the chicken and cut the fries a day in advance. Store them separately in the fridge until ready to cook.
- Freezing: Freeze uncooked breaded chicken tenders and seasoned fries on a baking sheet, then transfer to a freezer bag. Bake straight from frozen, adding a few extra minutes to the cooking time.
- Reheating: To maintain crispiness, reheat leftovers in the oven or air fryer at 350°F (175°C) for 5-10 minutes.
With these tips and variations, you can make this recipe your own and keep it exciting every time you serve it. Ready to explore some creative serving suggestions? Let’s move on to the next section!
Serving Suggestions
Now that your crispy chicken tenders and golden fries are ready, it’s time to think about how to serve them in a way that’s both delicious and visually appealing. Whether you’re hosting a casual dinner, a game-day gathering, or just treating yourself, these serving suggestions will elevate your meal to the next level.
Classic Pairings:
- Dipping Sauces Galore:
- Offer a variety of dips like ketchup, ranch, BBQ sauce, honey mustard, or garlic aioli.
- Create a dipping sauce bar for a fun, interactive experience.
- Fresh and Light Sides:
- Balance the richness of the dish with a simple green salad or coleslaw.
- Add a tangy vinaigrette or creamy dressing to complement the flavors.
- Veggie Sticks:
- Serve with carrot sticks, celery, or cucumber slices for a refreshing crunch.
Creative Presentation Ideas:
- Family-Style Platter:
- Arrange the chicken tenders and fries on a large wooden board or platter for a rustic, shareable presentation.
- Garnish with fresh herbs like parsley or chives for a pop of color.
- Individual Baskets:
- For a fun, diner-style vibe, serve each portion in paper-lined baskets or small trays.
- Add a mini ramekin of dipping sauce to each basket.
- Loaded Fries:
- Turn your fries into a meal by topping them with shredded cheese, crispy bacon bits, and green onions. Add a dollop of sour cream or guacamole for extra indulgence.
Perfect for Parties:
- Game-Day Spread:
- Pair your chicken tenders and fries with other finger foods like mozzarella sticks, nachos, or sliders.
- Set up a DIY topping station with sauces, cheese, and jalapeños for a customizable experience.
- Kid-Friendly Plates:
- Cut the chicken tenders into smaller pieces and serve with a side of fruit or veggie sticks for a balanced kids’ meal.
- Use fun-shaped cookie cutters to create star or heart-shaped fries.
Elevated Dining:
- Gourmet Touch:
- Drizzle truffle oil over the fries and sprinkle with Parmesan and fresh herbs for a restaurant-worthy upgrade.
- Serve the chicken tenders with a side of gourmet aioli or chimichurri sauce.
- Wine or Beer Pairing:
- Pair with a crisp lager, pale ale, or sparkling cider for a refreshing contrast.
- For wine lovers, a light Chardonnay or Pinot Grigio complements the dish beautifully.
Quick Tip:
If you’re serving a crowd, keep the chicken tenders and fries warm by placing them on a baking sheet in a 200°F (95°C) oven until ready to serve. This ensures they stay crispy and delicious.
With these serving suggestions, your chicken tenders and fries will not only taste amazing but also look like they came straight from a gourmet kitchen. Ready to wrap things up? Let’s head to the conclusion!
Conclusion
There you have it—your ultimate guide to making crispy, golden chicken tenders and fries at home! This classic comfort food duo is not only easy to prepare but also endlessly customizable to suit your tastes and dietary preferences. Whether you’re cooking for a family dinner, a game-day gathering, or just treating yourself, this recipe is sure to become a favorite in your kitchen.
By making your own chicken tenders and fries, you’re not only saving money but also enjoying a healthier, fresher version of a takeout staple. Plus, with the pro tips, variations, and serving suggestions we’ve shared, you can keep this dish exciting every time you make it.
So, what are you waiting for? Grab those ingredients, preheat your oven (or air fryer!), and get ready to create a meal that’s crispy, comforting, and downright delicious. Don’t forget to share your creations with friends and family—they’ll be begging you for the recipe!
Final Thoughts:
- Experiment and Have Fun: Don’t be afraid to try new seasonings, dips, or cooking methods. Cooking is all about creativity!
- Share the Love: If you enjoyed this recipe, pass it along to someone who could use a little comfort food in their life.
- Let Us Know: We’d love to hear how your chicken tenders and fries turned out. Share your photos, tips, or variations in the comments below!
Thanks for cooking with us, and happy eating!

chicken tenders and fries
Ingredients
For the Chicken Tenders:
- 1 lb chicken breast cut into strips
- 1 cup breadcrumbs regular or panko for extra crunch
- ½ cup all-purpose flour or gluten-free alternative
- 2 eggs beaten
- 1 tsp paprika
- 1 tsp garlic powder
- 1 tsp onion powder
- Salt and pepper to taste
- Cooking spray or oil for baking
For the Fries:
- 2 large russet potatoes cut into thin strips
- 2 tbsp olive oil
- 1 tsp smoked paprika optional
- Salt and pepper to taste
Step-by-Step Instructions:
- Prep the Chicken Tenders:
- Pat the chicken strips dry with a paper towel to ensure the coating sticks well.
- In three separate bowls set up your breading station: one with flour, one with beaten eggs, and one with breadcrumbs mixed with paprika, garlic powder, onion powder, salt, and pepper.
- Dip each chicken strip into the flour then the egg, and finally the breadcrumb mixture, pressing gently to coat evenly.
- Prepare the Fries:
- Preheat your oven to 425°F 220°C.
- Soak the potato strips in cold water for 10 minutes to remove excess starch then pat them dry thoroughly.
- Toss the fries with olive oil smoked paprika (if using), salt, and pepper until evenly coated.
- Cook to Perfection:
- Arrange the chicken tenders and fries on a baking sheet lined with parchment paper or a silicone mat. Make sure they’re spaced out to allow even cooking.
- Lightly spray the chicken tenders with cooking spray or brush them with oil for extra crispiness.
- Bake for 20-25 minutes flipping halfway through, until the chicken is golden brown and cooked through (internal temperature of 165°F) and the fries are crispy.
- Serve and Enjoy:
- Let the chicken tenders and fries cool slightly before serving. Pair them with your favorite dipping sauces like ranch BBQ, or honey mustard for an extra flavor boost.
Instructions
Step 1: Prep the Chicken Tenders
- Dry the Chicken: Pat the chicken strips dry with a paper towel. This helps the coating stick better and ensures a crispier finish.
- Set Up Your Breading Station:
- Bowl 1: Place the flour.
- Bowl 2: Beat the eggs until smooth.
- Bowl 3: Mix the breadcrumbs with paprika, garlic powder, onion powder, salt, and pepper.
- Coat the Chicken:
- Dip each chicken strip into the flour, shaking off any excess.
- Next, dip it into the beaten eggs, letting any extra drip off.
- Finally, press it into the breadcrumb mixture, ensuring an even, generous coating.
Step 2: Prepare the Fries
- Soak the Potatoes: After cutting the potatoes into thin strips, soak them in cold water for 10 minutes. This removes excess starch and helps achieve that perfect crispy texture.
- Dry Thoroughly: Drain the potatoes and pat them completely dry with a clean kitchen towel or paper towels. Any moisture left can prevent them from crisping up.
- Season the Fries: Toss the dried potato strips with olive oil, smoked paprika (if using), salt, and pepper until evenly coated.
Step 3: Bake to Golden Perfection
- Preheat the Oven: Set your oven to 425°F (220°C) and line a baking sheet with parchment paper or a silicone mat for easy cleanup.
- Arrange on the Baking Sheet:
- Place the breaded chicken tenders on one side of the sheet, leaving space between each piece for even cooking.
- Spread the seasoned fries on the other side, ensuring they’re in a single layer.
- Cook:
- Lightly spray the chicken tenders with cooking spray or brush them with oil for extra crispiness.
- Bake for 20-25 minutes, flipping the chicken and fries halfway through. The chicken is done when it reaches an internal temperature of 165°F, and the fries should be golden and crispy.
Step 4: Serve and Enjoy
- Let It Rest: Allow the chicken tenders and fries to cool for a few minutes before serving. This helps the coating set and keeps the chicken juicy.
- Add Your Favorite Dips: Serve with classic dipping sauces like ketchup, ranch, BBQ, or honey mustard for an extra layer of flavor.
- Garnish (Optional): Sprinkle fresh parsley or grated Parmesan over the fries for a gourmet touch.
Notes
| Nutrient | Amount |
|---|---|
| Calories | 450 kcal |
| Total Fat | 18g |
| Saturated Fat | 3g |
| Protein | 30g |
| Carbohydrates | 45g |
| Fiber | 4g |
| Sugar | 2g |
| Sodium | 600mg |
FAQs
Got questions about making the perfect chicken tenders and fries? Don’t worry—we’ve got you covered! Here are answers to some of the most common questions to help you nail this recipe every time.
1. Can I make this recipe gluten-free?
Absolutely! Use gluten-free breadcrumbs or crushed cornflakes for the chicken coating, and ensure your flour and seasoning blends are gluten-free certified. For the fries, simply season as usual—they’re naturally gluten-free!
2. Can I use an air fryer instead of an oven?
Yes, and it’s a great option for extra crispiness with less oil! Cook the chicken tenders at 375°F (190°C) for 12-15 minutes and the fries for 15-20 minutes, shaking the basket halfway through.
3. How do I store leftovers?
Store leftover chicken tenders and fries in an airtight container in the fridge for up to 3 days.
To reheat, use the oven or air fryer at 350°F (175°C) for 5-10 minutes to maintain crispiness. Avoid the microwave, as it can make them soggy.
4. Can I freeze uncooked chicken tenders and fries?
Yes! Freeze the breaded chicken tenders and seasoned fries on a baking sheet until solid, then transfer to a freezer bag. When ready to cook, bake straight from frozen, adding a few extra minutes to the cooking time.
5. What’s the best oil for frying if I don’t want to bake?
For frying, use an oil with a high smoke point, like canola, vegetable, or peanut oil. Heat the oil to 350°F (175°C) and fry the chicken tenders for 4-5 minutes per side, and the fries for 3-4 minutes, until golden and crispy.
6. How do I make the chicken tenders extra crispy?
Double-coat the chicken by dipping it in the egg and breadcrumb mixture twice.
Let the breaded chicken rest on a wire rack for 10 minutes before cooking.
Use panko breadcrumbs for a lighter, crunchier texture.
7. Can I use sweet potatoes instead of regular potatoes?
Definitely! Sweet potatoes make a delicious, slightly sweet alternative. Cut them into strips, season as usual, and bake or air fry until crispy.
8. What dipping sauces pair well with chicken tenders and fries?
The options are endless! Try classic choices like ketchup, ranch, or honey mustard, or get creative with garlic aioli, sriracha mayo, or tangy BBQ sauce.
9. How do I prevent the fries from sticking to the baking sheet?
Use parchment paper or a silicone baking mat to line your baking sheet. This not only prevents sticking but also makes cleanup a breeze.
10. Can I make this recipe ahead of time?
Yes! You can bread the chicken and cut the fries a day in advance. Store them separately in the fridge until ready to cook. For longer storage, freeze them as described above.
We hope these FAQs help you feel confident and ready to create the ultimate chicken tenders and fries. If you have more questions or tips to share, drop them in the comments below-we’d love to hear from you!